Saturday, December 29, 2012

Ferns: Making Progress

Here is the latest version of my fern piece. As you can well guess, I didn't finish it in time to give away at Christmas. However, I did fall in love with this little piece somewhere along the way.
Since the last photo posted, I repainted the background with more Setacolor. I am much happier with the color now. I darkened all of the areas between the ferns with a russet and a teal paint and then added more gray and turquoise to the sky to get rid of the distracting white.
 I then dug through my stash and found this raisin colored silk that came from an old kimono. It was too bright, so I wadded it up and splashed some dark brown and black paint on it and set it in a window to dry. I am much happier with it now.

And the dragonfly is a female Halloween Pennant ( Celithemis eponina) that I made using metallic silk organza for the wings and dupioni for the body. I added the detail to the body with Tsukineko inks and my Identipens and then hand appliqued the body on.
The "streamer' like pieces are simply bits and pieces of different silk stitched onto solvy which was then dissolved. I call them kite tails.
 I am anxious to get back to work on this piece, but now I am too busy with work, so it will have to wait for a while.
When I occassionally find the time to create my own work I am reminded of how much I love doing this and why I started in the first place.
 In case you wondered, I picked another piece from my inventory to give to my friend so that I didn't feel too guilty about keeping this one for myself.

Tuesday, December 04, 2012

New Work

This is a piece that I painted some time ago, and I would like to finish it as a Christmas gift for a friend. It is painted on 16mm silk crepe with Setacolor. I find that the images around the outside, the ferns, are too dark. Overall, the piece has too little value to be of interest.
 The other problem is that it is a square, measuring 30", which I find bothersome.  I would like to add "columns", or strips of fabric, on the sides to finish it off. That is if I can correct the color.
My art teacher suggested that I try adding some purple in the areas between the ferns, and then overpaint the ferns with a brighter green.
Any suggestions would be greatly welcome.

Friday, November 30, 2012

Finished is Better Than Perfect

     My primary business for the last eleven years has been longarm machine quilting for others. It's funny, but November and December are often my slowest months  of the year as everyone thinks I'm completely swamped with work.  I have learned to expect this slowdown and consider it a wonderful gift to have a bit of free time. 
      Another aspect of my business that I'm developing is a new product line: my Textile Design Stencils. With the development of my new designs, marketing, video development, teaching, and writing, I have a lot to juggle, and these tasks usually get neglected when I'm busy machine quilting for others.
Video camera graciously loaned to me by my brilliant step sister.
I'm so intimidated by this apparatus that I have a hard time even opening up the gear bag.

     So, these last couple of weeks I've been trying very hard to upgrade my technological skills. The most difficult lesson I've had to learn is when to just stop worrying  the minute details to death that plague me so. It's been incredibly freeing to let go of the frustration of things that won't work right, change of their own accord, or are so mind boggling in their complexity.
A beautiful quilt I'm quilting for Kemset.
     Right now I am reveling in the fact that I have grown in great leaps and bounds as I tackled tasks that have long daunted me. Tomorrow I am back to the longarm quilting as orders are thankfully beginning to roll in again.
My next challenge is to develop project and time management skills, and I would really love to hear from any of you who have suggestions on this topic.

Free Giveaway: Silk Scarf of Your Choice, Shipping Included
"Like" my new Facebook Business Page
You'll be automatically entered in the drawing for December 15th.
Click the Link above to go to my page.

Friday, November 16, 2012

DIY Weekend Project: Settee Makeover

This weekend I am going to recover the cushions on and old rattan settee that belonged to my great grandmother. It is signed on the bottom by the maker with a date of 1920. My mother said that she remembers it being on her grandmother's front porch when she was a young girl.
I found this really soft chenille fabric several years ago and repainted the settee to match probably five years ago, and it has just been sitting there all this time. I plan to also redo the cushions.
My friend Jeanne Blonski is coming over tomorrow to work on quilting a wallhanging, so I thought it would be a perfect time to tackle this long overdue project. I also want to remake the pillows using the existing fabrics. It should be fun. I'll post the photos of the finished project.

I know this fabric doesn't really go with the style of the furniture, but it was so warm and soft that I couldn't resist buying it.
 

Friday, November 09, 2012

Purple Poppy Dress


Here is another of my upcycled clothing pieces that was hand-painted with my Poppy Stencil. This was a 15 year old cotton knit turtleneck dress that spent the last several years hiding out in the back of my closet. I have so much fun making these pieces, but it is even more fun to wear them.
The ruffles are made from hand-painted silk organza. Now I have started embellishing the clothing with a little bit of hand embroidery and beading. It's amazing what a little bit of texture and sparkle can add to a piece.
 
I think I this could be an ongoing project. I just pick it up in the evening when I feel like doing a little handwork and add a few more stitches. I am putting together a tutorial on this project for my Free Newsletter that is coming out next week if anyone is interested.

Friday, April 20, 2012

Surface Explorations

Although I have been dyeing fabric with Procion MX dyes for more years than I care to remember, I was always plagued by niggling little unanswered questions about the process. People kept asking me to teach dyeing workshops, but I knew that I had a lot of research and experimentation before I felt capable of proceeding.
Fabrics dyed in the same dye pot: cotton on top and silk on the bottom.
 I realized that sometimes you really do just have to do the work before you can move forward. Well, I did the work, and I figured out the answer to my biggest problem; why did I achieve such different results between the silk and the cotton that I dyed?
I was so pleased with my results that I wanted for others to benefit from my findings as well, so I was absolutely thrilled when Jane Davila contacted me about writing an article for the premier issue of the new E-Mag Surface Explorations. Jane and her staff have done a magnificent job with this publication, and I am especially impressed with the high quality photography and the zoom capability that allows you to see every single thread in clear detail. Hats off to Jane and her staff!

Bonus Project! In my article I included complete instructions on dying a 12 step color wheel in cotton and silk along with many extras. So please have fun with this, and I sincerely hope that the information is as helpful to you as it has been to me.

  Several of the authors are doing a blog tour, so please check out the links below. The links don't show up very well, but click on the dark area to the right of the name and they will work.
Mon 4/16 Lindsey Murray http://quiltingdaily.com
Wed 4/18 Jackie Lams http://studiolams.com

Thu 4/19 Lyric Kinard http://lyrickinard.blogspot.com
Fri 4/20 April Sproule http://sproulestudios.blogspot.com
Tues 4/24 Jane Davila http://janedavila.blogspot.com

Tuesday, April 17, 2012

What Fun!

I haven't made any bags for a really long time. In another life, I was once a handbag designer for a large Canadian firm. Back then, I had to worry about the drafting of the dies for the die makers, cutting layouts, the percentage of waste  for each new style, and of course the cost accounting.
Now I only have to concern myself with which color or motif to use next. I had a wonderful time creating these little bags, and I sold several at the East Bay Heritage Quilt Show in Richmond, CA, last month.
This is what I started with. I cut my panels from my hand dyed Radiance and ultra sateen. Below are a couple of my favorites that I sold at the show. I had to take the photos on the fly before they disappeared with their new owners. The bags were all printed with my Textile Design Stencils.

Here is my Beetle Bag that I made with black ultra sateen.I love the colors on this piece. I hang these bags on the wall as art when I'm not using them.


The bag on the right is my Thistle Bag. This bag was also printed on black ultra sateen. I have a few more of my finished bags available on my Website.

Friday, March 30, 2012

Back to the Drawing Board: Insects

My latest area of interest is bugs and how to feature them in my work in an interesting manner. That will not be a surprise to anyone who has been following me on Pinterest lately.
What intrigues me most about insects is the unfathomable number of variations , textures, colors, and shapes that these life forms have evolved into.
Every single species plays an integral role in maintaining their particular ecosytem, and it is hard to imagine how the delicate balance of life will be upset as these species become extinct.

During the last couple of weeks I have finally started drawing again. My usual routine is to wake by 5:30 AM, make a quick cup of strong coffee, and curl up in bed with my sketchpad for an hour or so. It is a wonderful way to start the day.


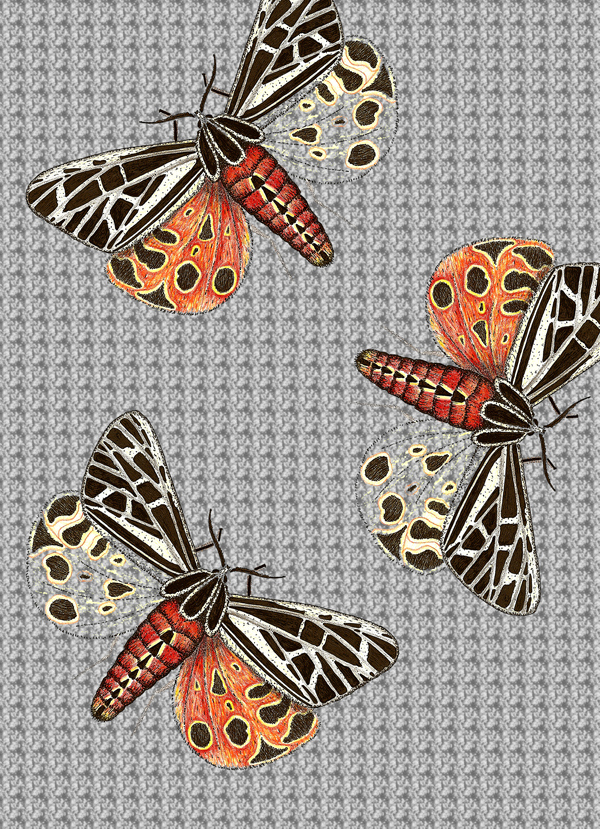
This is an image of a Virgin Tiger Moth that I have been working on for the past couple of days using pen and colored pencils. I love the distinct  markings and the bold colors. I could not wait to finish my drawing before scanning it and playing with the image in Photoshop. It is amazing how much more alive these creatures seem in my composite image.
 I am absolutely hooked, and my weary little brain is on overload momentarily as it is being flooded with images and ideas for new ways to use my new little friends. I can't wait to start putting them on fabric, and I will probably start going through my shibori pieces to see how I can integrate these images with my hand dyed fabrics.

Friday, February 10, 2012

Upcycled:My Little Black Dress

As some of you know, years ago I began creating wearable art clothing. It has been so incredibly long since I have made any garments that it feels really strange to do so again. It feels as if I have never done this before, and I seem to have forgotten the majority of what I once knew. However, I am very persistent, and I hope that some of that knowledge eventually creeps back into my brain.
The Beginning
This is the second upcycled piece that I have done in the last couple of months, and I am having so much fun doing these pieces. The fact that these garments were destined for the trash is very liberating for my creativity.
Rough Production Sketch


My  New Little Black Dress
This piece was painted with my Passion Flower Stencil

I used Lumiere  and Neopaque fabric paints which are both made by Jacquard. The commercial  pattern that I started with was Butterick # B5673. This is my first little video that I have created by myself so please let me know what you think. I have wanted to create video tutorials for a very long time, and I have been working diligently to learn the process of  filming and editing. Once I master the basics, I will be free to focus on creating better content with more detailed information. I would love to hear any feedback that you have to offer.