 |
| Finished. I accomplished what I set out to do, and I learned what to do and what not to the next time around. |
Below is a section of the background I made from layering torn strips of cotton and silk. After basting down the strips, I stitched the layers together using a simple Japanese Boro, or mending, style of stitching. This is just a simple running stitch.
Once you wash the organza, it loses quite a bit of its body, and it becomes a bit too soft for this particular use.
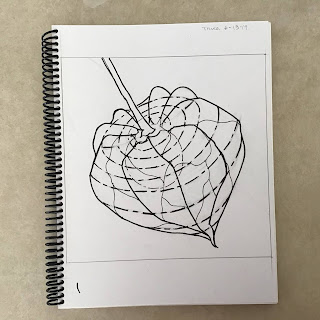
I have done a rough sketch of my image, a Chinese Lantern pod, and I outlined the drawing with black ink to simplify it and make it easier to trace.
The stabilizer I am trying out is Sulky Heat Away Clear Film that I found on Amazon.

I traced my image on to the stabilizer with a Fine point Sharpie. The instructions with the stabilizer say not to use a Sharpie, and I understand that in the process of heating the stabilizer to dissolve it, there is a danger the ink might transfer to your fabric or thread. The instructions recommend using a Frixion type pen that is removed when applying heat, but I found the marks really hard to see.
I did a test sample first, and I did not have that problem with the ink transferring. I would absolutely recommend that you do a test sample with your fabric, choice of marker, and thread before doing work of this nature on an actual piece.
I worked a few sample stitches first with a couching stitch to outline the shape and some needle weaving stitches to fill the area in. Once I had enough stitches to experiment with, I applied the heat with my iron on a high setting. I was pretty hesitant to iron over this plastic like substance with my brand new iron, but it actually turned out to be just fine.
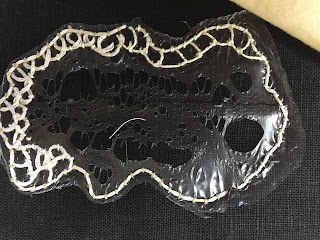
You can see the film beginning to melt away with the application of the heat. And in the image below, you can see there are little bits of the film stuck in the really closely stitched areas. But, almost all of the film actually dissolved.
In my final review of this product, I am going to give it a try on my actual small project where I need something to stabilize the very open stitching. If I was working on something with very dense stitching, I probably would not choose this product as I might not be able to remove it all.
Now all I need to do is figure out this needle weaving thing, and then I can finish my little project. I am really glad I decided to experiment with a really small piece before tackling something much larger and more involved using these same or similar techniques!
 |
| Here the main areas of the lantern have been outlined using couching with 4 strands of DMC cotton floss. |
Final Decision:
I would not use this product again. As you can see in the previous image, there were some little bits of stabilizer that remained under the denser stitching. I could not get rid of these. On my final project, it took me ages to get rid of all those nasty little bits.
Sometimes all you learn when trying something new is that you will never, ever attempt that again. That is what I learned, so I hope you can benefit from my little experiment!


2 comments:
I haven't seen this product yet--thanks for the warning--but I have used Sulkey's water dissolvable with great success; how would that work with your project?
Post a Comment